Monday, October 24, 2011

iTunes 10: WiFi Sync Your iPad/iPhone


One of the best things about the new iTunes 10 software is that it allows you to do wireless syncing. Finally, gone are the days where you scramble for your little white USB cable just to add a single song to your iPhone.

If you set the option appropriately, you can now sync your iOS device to your computer wirelessly when they're on the same WiFi network! The procedure's pretty simple:

How to set up WiFi Syncing For Your iOS Device
[1] Plug in your iOS device to your computer.

[2] Open iTunes. Click on the device as it appears in the left hand panel. Now, you are presented with what I call the 'Device Management' screen.

[3] At the bottom of the page, you'll see a section called Options. Check the box called Sync with this iPad over WiFi. (You can replace the word iPad with iPhone depending on your device.)

[4] Now, make sure to Apply these new settings by clicking on the bottom right button. If you don't do this, iTunes won't save the changes you just made for your iOS devices. 


[5] Now, unplug your device from iTunes. Congratulations! You have just configured the new settings. Now it's time to test it out! 

[6] Next time you start up iTunes, you'll be able to manage your device without having to plug it in. 

As long as the device is connected to the same Wi Fi network as your computer, the device will appear in your computer's iTunes. 

Devices on the same wireless network appear in iTunes without being manually connected. 

Before, you would have had to plug in the iOS device to see them appear under the Devices section in iTunes. Now, they should appear in iTunes even without being physically connected to your computer. 

[3] Make the changes you'd want in the Device Management screen. Or, if you just automatically sync your whole iTunes library, you don't have to do anything! The only thing you must not forget, is to click on Sync. If you don't click Sync, then it won't sync, and this will all have been for naught. This new iTunes 10 feature is magical, but it's not that magical. 

Personally, I couldn't believe this WiFi syncing; it seemed too good to be true. But, of course, it totally works! On my computer, I designated a new playlist to sync, and after I pressed Sync, the playlist appeared on my iPhone! So awesome!!!!! 

Press Sync in iTunes to watch the magic happen!

Enjoy these fruits of the wireless revolution!

Saturday, October 15, 2011

iOS 5: Notifications Center


Yesterday, I did a lot of trial-and-error-ing Mythbusters style trying to 'fix' my Notifications Center (Really? Apple's new iOS wasn't as annoyingly cumbersome and flawed as I initially thought? Huh. Who'da thunk it? ). All turned out well in the end. For the interested, read on! 


I love Mythbusters (the people and the show). So. Much. (Image from Mattson Creative)


The notifications center was probably the biggest thing that the iOS 5 boasted. People ranted and raved about it in the months preceding the software update. Last night though, I mostly ranted to myself. For some reason (actually, quite a few reasons...all of which will be addressed below), my notifications center wasn't working!

Let me explain.

This is how it was supposed to look.


See that? Updates about your phone, calendar, messages, reminders. All that was missing from my notifications center, and I was so sad! But, a few hours later and after much testing, I figured out what needed to be done to get the notifications center working. I'll explain below.

I'll address the following subjects as they pertain to the notifications center:

  • Mail
  • Calendar
  • Reminders
Mail 

Key finding: The notification center only reflects mail for the mailbox linked to your iCloud account. 

My problem: If you read my earlier post on how to create a separate Apple ID account for your iCloud information, you'll understand how I created a separate .me account just for my iCloud information. Obviously though, I didn't want notifications for this essentially unused .me email account--I wanted notifications for my personal email account! I explain how to do it below:


How to change the primary email account associated with your Apple ID
[2] Go to Manage your account

[3] Log in with the Apple ID that you used to register iCloud.

[4] Underneath Primary Email Address, you will see that the Apple ID email and the primary email address are identical. For some, this may be perfect; if that's the case, I don't think you need to read on. However, for others, this may be the root of your sad & empty notification screen problems. 
If you created a new @me.com account for iCloud,
 you probably don't want email notifications for the almost zero emails you may get there. 
[5] To remedy this, simply choose Edit in the Primary Email Address section, and then type in the email address for which you do want notifications. Then click Save.


[6] You should now see the new personal email listed. 

[7] Choose Save Changes
[8] We're now done with this step. 

And with that, my friends, you should now be receiving notifications for the email you put under Primary Email Address. Simple solution! 

So, what's the lesson here? 
You only receive email notifications for the Primary email address associated with your Apple ID. 

Calendar

How it works: The Notifications Center only shows events on your iCloud calendar. I didn't have a problem with this part of the Notifications Center. 

To learn how to move Google Calendars into iCloud, read my post on how to do it here


The lesson about calendars? 
Only events in your iCloud calendar will appear on your Notifications Screen. 


Sad, blurry image.
Reminders

Key finding: Only reminders with Alerts set for tomorrow or later will appear on today's Notification Screen. 

My problem: I like streamlined, centralized systems. Which means I wanted my daily events calendar and reminders (in addition to my unread email and messages) to appear on my Notifications screen. At first, when I made new reminders, they wouldn't appear on the Notifications screen. Quelle horreur! After much fiddling with reminders, I found a solution. 


First, you should realize there are multiple ways of making reminders--on your Mac in iCal, on your iPad in the Reminders app, and on your iPhone in the Reminders app. I will talk mainly about making reminders in iCal. 

How to make reminders in iCal that will show up on your notifications screen
[1] Open iCal. If you haven't done so already, you'll want to View > Reminders. Now, there should be a column on the far right of your iCal window labelled Reminders

[2] Add a new reminder by either going to File > New Reminder, or if you prefer keyboard shortcuts Command + K. If you want to be really fly, after you press Command + K, type in Command + E so you can edit it easily (like adding an alert!) without doing that annoying right click move. 

[3] Give it the title you would like, and if you are less concerned with the reminders appearing in the notifications center because you plan on opening the Reminders app to check on your To-do lists, then that's all you have to worry about. 

However, if you want your reminders to appear on the Notifications Screen, you'll need to go a bit further. Basically, you need to add an Alert

But then the question becomes, when do I set my alert to allow this reminder to appear on today's notification screen? 

Say that today I wanted to Buy Cinnamon, Flour, and Sugar, and I wanted that reminder to stay on my screen all of today. I would actually have to set the alert for tomorrow if I wanted to have it on my notifications screen.

If you're interested in seeing how I figured that out, it involved a lot of methodical changes to my reminders using my computer, and seeing which ones appeared on my iPhone. When I first approached it, I for some reason took two factors into consideration instead of just one--due date and alert. So I made as many combinations as I felt were possible, and then I went to my iPhone Notification screen. 

Here are all the due date/alert permutations I thought possible. 
I then went to my iPhone to make sure the Reminders from iCal synced to my Reminders app on my iPhone. Yup, they did! 

The reminders successfully appeared on the iPhone. Hooray for iCloud!

Then came the moment of truth. I pulled down my notification screen to see which reminders made the cut. As you'll see, the only one that survived had an alert for tomorrow. The ones with no alert didn't show, and the ones with an alert for today also didn't show up. Also, a notification appears on the day before the alert only. So, for example, if today were Monday, and I set an alert for Friday, it would not appear on my notification screen until Thursday.  


But then, I just realized, that I was doing bad science. In my frantic attempt to rid myself of an 'uncooperative' Notifications / Reminders system, I was working with two factors instead of one. So, just to make sure that it was the alerts setting and not the due date setting that was responsible for my success, I added one more task on my iCal. I added, a reminder with no due date but an alert for tomorrow. And as you can see below, that one flies nicely onto the Notifications screen to. 


So after all this madness, what's the conclusion? 

To get a reminder to appear on today's Notifications Screen, the reminder must have an alert set for tomorrow. 


Notifications appear on the day before the alert is set to appear.

This it the part where a sign saying BUSTED or CONFIRMED would clang to the ground in slow motion if this were a Mythbusters episode. Unfortunately, I'm not a real Mythbuster (only one in heart!), and I didn't really have a myth to bust. 


I hope this post helps others who found themselves similarly banging their heads against the table after thinking the Notifications Center on iOS 5 doesn't work. It does work, it just has a couple of specifications that aren't too obvious at first. Once you do realize what requirements have to be met, then it becomes a piece of cake! 

Hearts, stars, and horseshoes,
Take-a-tech-tip

Friday, October 14, 2011

iCloud: Moving Google Calendars to iCloud

Well, I guess when I mentioned 'near future' in the previous post that 'near future' really meant near near!

Let's return to our familiar format of Q&A.

Q: Can I move calendars from Google to iCloud? 

A: Yes! Yes you can!

Q: Is it easy? 

A: Yes! Yes it is! In fact, it's a million times easier than I expected. It's actually way easier than syncing contacts and revising all of them, and definitely easier and faster than the actual iOS 5 update process!

Q: Okay, what do I need to know? 

A: There're a couple things. Here we go, numbered points style. Hopefully the pics will help you out.

[1] Export all your calendars from Google calendar. Open your Google calendars in your nearest web browser. On the top right corner, click on the Gear symbol. Select Calendar Settings. Click on the Calendars tab.

You will see the following screen. At the bottom of the page, click on Export calendars. What this does is it will make a .zip file containing all of the calendars.


[2] Open iCal. Go to File > New Calendar > iCloud. Give it the name of your choice.  


The calendar will now appear in your Calendars list. 


[3] Open your Finder window. Double click on the .zip file. Doing so will put an uncompressed copy of the folder in the same location. Open this uncompressed folder, and double click on the calendar file (ends with .ics) of your choosing. Even though the name will be long, the calendar name should be there at the beginning of the file name. 


[4] You will receive a 'warning' which you can ignore. Click Open

[5] You will be redirected to iCal, where you will be asked to select which calendar to place this file. Select the iCloud calendar you recently made. Click on OK


[6] That's it! Now you're done. The Google calendar has been successfully imported into the iCloud. These events will appear on any iOS 5 device that is syncing calendars using iCloud. If you want to check that everything is in order, visit www.icloud.com. Only calendars that were successfully uploaded to iCloud will appear in the browser. 

Of note, to make life easier, you will probably want to the iCloud calendars your default. To do this, go to iCal > Preferences. Change the Default Calendar as desired. 


To read Google's original directions for the procedure, click here. 


iPhone: iOS 5 and iCloud


The much iOS 5 has finally arrived. I've recently synced my iPhone and iPad, and here are some initial findings. Here, I do an informal Q&A with myself from a few hours prior, with the hopes of helping others who may have similar questions.

Q: How long does backing up take? 


A: It depends. I had to update to the newest iTunes version, and that required at least 15 minutes. Then, iTunes will most likely begin syncing your iPhone to your library. Don't bother. Click on the little 'x' at the top of your iTunes window where you regularly read those status updates such as 'Step 1: Blah blah you don't really care it just means you can't unplug your iPhone'. Once you click on your iPhone's name in the left menu bar, choose Update.

The update will begin to download, and this will probably take another 20 minutes at least. Once it's downloaded, you are ready to install. But wait! Make sure to do two things--create a backup and transfer your purchases. I tend to err on the side of caution.

After backing up (this probably takes another 20 minutes), you can install your update! Installing takes a long time--at least 20 minutes. iTunes backs up your iPhone for you (again, I think), and does some fancy business.

Q: What is iCloud? 


A: Glad you asked! iCloud is supposed to remedy everything that has gone kind of crazy with the many electronics per person trend. Music downloaded on your computer via iTunes? With iCloud, you don't have to worry about syncing with the dreaded USB cable, you can download it directly to your iPhone or iPad! True, the catch is you need WiFi to do any of this, but hey, life without WiFi rarely happens nowadays. Centralizing your music, calendar, contacts, and more? Sounds great, right? It is!

Q: How do I get iCloud? 

A: iCloud collects all the data mentioned earlier (contacts, calendars, etc) under one Apple ID.

Q: Wait a minute, what if I share an Apple ID account with my family? Is it possible for us to share our iTunes purchases but not our contacts, calendars, etc? 


A: Why, yes! Yes there is! To put things simply, you can have two Apple IDs--one for your iTunes purchases, and one for your contacts/calendars/etc (Apple's official directions are here).

When you install the new iOS, you will be asked to log in with either your current Apple ID or to make a new one. For those are interested in having 2 Apple IDs, you will want to create a new Apple ID at this point. This new Apple ID you're creating will be your Contacts/Calendar/Etc Apple ID. Make sure to do this step because it will become very important soon.

Now, this is an important point I'm about to make. When you've installed your new software, it'll ask you to log into iCloud. Log in with your contacts/calendar/etc Apple ID, not your iTunes purchases Apple ID.

This is the only special point. Everything else in the installation process is pretty self explanatory.

After you've installed everything, you'll now want to set up your iTunes store account with your iTunes purchases Apple ID. To do this, go to

Settings > Store on your iPhone.

From here, type in the iTunes Purchases Apple ID at the bottom of the screen. And voila! Now you can enjoy the personalized benefits of iCloud while sharing your iTunes account with family members!

Q: What is the best part of iCloud?

A: Right now, since I am not using iCloud for email but mainly for contacts synchronization, I'd have to say SYNCING CONTACTS IS AMAZING. Let me explain.

[1] Contacts are ridiculously important. If I lost my phone, goodness gracious I don't know what I would do.

[2] Also, my way of logging contacts has been pretty inefficient over the last few years. There are multiple entries per person (reminders of my Nokia phone past--I had contacts like Mom home, Mom cell, and Mom office).

[3] I also never found a good way to sync contacts.  I dabbled with Google to sync contacts, but I still sometimes ended up with annoying duplicates. There was never an issue of contacts getting lost or accidentally deleted, but the system was far from efficient. And, mind you, I thrive on efficiency and streamlined systems.

[4] I hate typing extended amounts of things on touch screens. So really, I didn't have the patience or accessory eye muscle power to slowly go through my iPhone contacts one by one on that tiny (lovable) little screen.

And there is where iCloud has really stood out for me. Among all the updates about Reminders, Notification Centers, and iMessages, the only thing that really is life-changing for me is this iCloud Contacts Sync.

I will continue to explain.

[1] Once you agree to sync your contacts with your iCloud account, your contacts are all in one place. You will be reminded that iCloud and GoogleSync cannot coexist (for those who also use GoogleSync), and that's just fine.

(Side note: For Mac users, I highly recommend backing up your Address book anyway. I did, although I never ended up needing it throughout this process. Open Address Book. Go to File > Export > Address Book Archive) 


[2] Once you've installed iCloud on your iPhone and Mac, you can now edit everything on your Mac. Do you know what this means? You can use you keyboard and a mouse. God, I went a little overboard and actually cleaned out my entire Address Book from A to Z. And now it's perfect! One card for each person or company with organized labelled numbers and emails. I love it.

[3] When you edit contacts using Address Book on your Mac, you can customize the title associated with the phone number. Normally, titles are 'home', 'work', 'mobile', etc. Well, did you know you can select 'custom' and type in your own? This becomes handy because I like to have one contact for a store, like Macy's for example, and then list all the various locations underneath. I will illustrate it for you below:
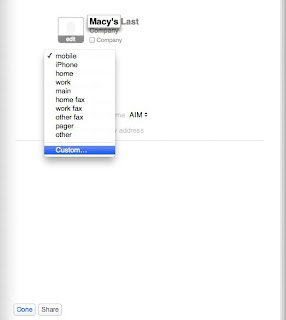
Select Custom under the telephone field title. 

Voila! Tres magnifique. 

During my mass clean of my contacts (for quicker Contact Card deleting, select the card name and press Delete), I also found some 'bugs' that were a little annoying at first. When you delete and edit a bunch of contacts, they may appear as 'No name' in your address book even after you continue editing. To solve this, make sure to press Done at the bottom of the card. Once you do this, those annoying shells of a contact card will disappear. I provide images below:
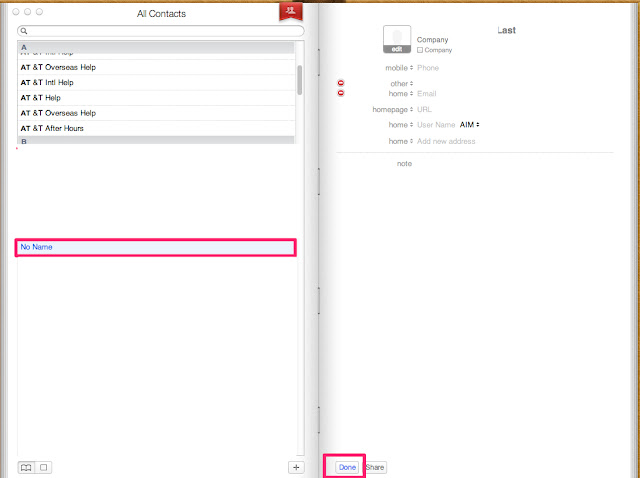
Once you click on Done, the No Name will disappear. 

A final issue of note that came up during this process--a  lot of my apps disappeared off my iPhone after the update. There were two options to remedying this--going to the App Store and redownloading all my purchased apps or syncing my apps from my computer. Going to the App Store and using the iCloud is not as easy as one would think. Each time you download an app from the iCloud, you are redirected to the home screen. Then you have to flip back to the App Store to download another app, at which point you are returned to the home screen. It's like running in virtual circles. No fun. So after three stubborn attempts to continue this, I decided on just syncing from my computer. When you look at your iPhone Management Screen (that's what I'm calling the page you see in iTunes), you choose to Sync All Apps.

Yes, the Apps return to your phone. However, they don't return to the pretty folders they were in before. This may be my fault, as I'm not very experienced in backing up (read: I'm lazy).

And that's basically it! I hope this helps whoever's interested in taking advantage of the new iOS 5.

If I have time in the future, I may address Calendars and whether it's worthwhile to jump from Google Calendars to iCloud's calendar, and how to go about doing it.

Until then, rock on, Mac users!